I have moved

Dear Reader
Thanks for stopping by and checking out my blog. I have moved on and my new blog is now called:

Please come and visit me there.
See you soon,

kristin
Showing posts with label Cake Decoration. Show all posts

11.9.12

Barbie cake for a birthday girl

Maggie, a friend's daughter turned 5 last weekend and I again made a barbie cake for her birthday bash. This time she asked me if I could dress barbie in rainbow colours. Rainbow colours can look a bit over the top but then I thought I might get away with using lots of different pastel colours to make up (or nearly) the colours of the rainbow.

I had not a great plan when I started of how I wanted the dress to look like it kind of evolved and it was so much fun! I guess I just still like playing with barbie even when I am way too old :-)
My daughter insisted on all the pearls and loved pressing them into the little flowers, couldn't have done it without her help. Just had to make sure she didn't eat too many before dinner, or no wait,  they must have dropped off the table (or so she said ;-).


31.7.12

Kiss Me Cake

I know Sonja, the owner of Kiss Me Cake, through our mutual friend Peggy Porschen. We both worked with Peggy in London (at different times though) but we had to move to the other side of the globe to get to know each other. She also worked for Konditorei and Cook in London as cake decorator and it's there where she decided to specialise in this trade.
Coming to Sydney she worked for the French cafe and patisserie "La Renaissance" in the Rocks and "Sweet Art" in Paddington.
However, it has always been a dream of hers to open her own shop and Sydney seemed to be the right place at the right time and so she started "Kiss Me Cake" in 2006.

The bakery.

Getting the order ready.

Square cupcakes - bestseller at Kiss Me Cake.

Off to the decorating corner...


Yum!
Rolling the fondant.


23.6.12

Bratz cake

Just finished this Bratz cake for a girl's 6th birthday party. The Bratz is not so different to Barbies but a bit less princessy and rather funky. Apart from their awful shoe choices I quite like the idea of a more contemporary fashion doll. Rock chick versus Cinderella anyone?

The tin for the cake was a bit too small so I baked another 22cm cake to put underneath to cater for more people. Since the Bratz has a much larger head and eyes it doesn't look too awkward having a bigger body now. It actually looked quite elegant with the longer body. Nothing wrong with being long and tall.  However my daughter noticed the big bum right away;-)


That's how I've done it: You'll need a Dolly Varden or similar shaped tin and a 22cm in diameter round cake tin to bake the cakes. In this instance I didn't bake the cake but here are some tips on how to best bake the cake).
You then need approx. 2 kg of ready-to-roll fondant icing and approx. 500 g chocolate icing, cachous. I used white, black, blue and purple icing already dyed from essential ingredients.
They are around $17 per 1 kg, quite pricey but the colours are very funky. You can also just get white and dye them with food colouring yourself. Be warned thought, the more colour you put in the stickier the fondant becomes.

Invert the cake and trim the base to ensure it sits flat. Brush away crumbs. Use a palette knife to spread the top of the round cake with a thick layer of chocolate butter icing and position the body cake on top. Cut along the edges so it looks like a cone again. With the palette knife spread a thin layer of butter icing around it (crumb coating) and let set in the fridge.

Apply a second thick layer of butter icing to the cake and smooth then put back into fridge. Roll out the purple fondant icing until 3 mm think and cover the cake board, cut along the edges to get a smooth finish.

Now is the time which for me is always a bit nerve wrecking. You have to move the cake from the working board to the covered board and to place the cake in the right spot. I use a big and sturdy palette knife to lift the cake up and over to the main board. Smooth and trim icing if necessary.

Roll out white icing to 2 mm thick and cut in a shape of a large triangle. Roll out black icing and cut uneven stripe and shapes and stick onto white triangle to create an animal print (at least, that's what I tried). Stick onto cake.
Roll out blue icing to 3mm thick so it fits around the cake and drape back over the white/black icing. Carefully trim icing at the bottom.

Insert the doll into the centre of the cake and make the bodice dress part. If you don't have the half-doll topper you can use any barbie with cling-wrapped legs. You then have to cut a wider hole to fit the torso into the cake (it's a bit of an operation really- but don't tell anyone).

Now comes the really fun part. Roll out any leftover icing to style the doll with any attire you can think of. The top of the dress, hand gloves, capes, belts, bracelets, you name it. Most often I make those cakes for little girl's birthday parties so sparkles, sprinkles and cachous are always involved ;-).

12.12.11

Gingerbread house party

This past Sunday was the 3rd Advent and it rained and rained and rained. Quite unusual to have so much rain in Sydney at this time of the year but on the other hand the best weather for staying indoors and bake and make gingerbread houses. It's a beloved Christmas tradition in Germany to bake (well, if you're pressed for time you can buy them already made as a gingerbread house kit. I saw them at IKEA the other day.) and decorate the house with smaller Lebkuchen (gingerbread) and anything that you can think of. Years ago I bought a gingerbread house mould from Chefs Tool Box. The mould guarantees that all sides are even and makes assembling the house an easy task but you'll need a lot of royal icing to stick it all together. Don't make the icing too runny or it will take too long to set. I always stick sugar cubes inside the corners to make sure the walls are standing upright and prevent them from going lopsided. My daughter and her friends were adamant to decorate the houses themselves and the three of them got quickly very busy and sticky ;-). It was so much fun to watch them but I was also very much looking forward to a nice glass of wine in the evening. However, when the evening came the rain stopped, at least for a little while, and we got invited to join in to a pre-Christmas street fete. It was beautiful to share a merry moment with some lovely neighbours and everyone enjoyed themselves including the kids scooting up and down the pathway.

In Germany gingerbread (Lebkuchen) is made in two forms: a soft form used for cookies, slices and cake and a harder form, particularly associated with carnivals and street markets such as the Christmas markets (I really miss those markets) that occur in many German towns. The hard gingerbread is used for shapes, which are then further decorated with sweets and icing. The German-style Gingerbread is often used to build Lebkuchen Haeuser similar to the "witch's house" in the German fairy tale Hansel and Gretel. These houses are popular Christmas decorations everywhere in Germany and often built by children with the help of their parents.


This recipe makes one house and gives you a bit extra.

125 g brown sugar
a pinch salt
300 g treacle
1 tablespoon ground ginger
180 g butter, softened
500 g plain flour
1/2 teaspoon bicarbonate of soda

1. Preheat oven to 170 degrees Celsius.
2. Beat sugar, salt and treacle, ginger and butter in a large mixer until combined and lighter in colour.
3. Add flour and bicarb soda and whisk until mixture forms a thick dough.
4. Place on lightly floured workbench and flatten with you hands. Press dough into mould.
5. Place mould on baking tray and bake for 20-30 minutes or until firm to touch (dough will crisp up once cooled).
6. Cool before removing from mould.


Use royal icing to assemble the house. I am sure your kids will love to help decorating the house with candies and Christmas cookies.

31.10.11

Barbie Cake

This time I made a Barbie cake for my daughter's 5th birthday party. The style is very similar to the one I made before (see the instructions here) but since my daughter loves pink and purple I included a purple layer and cape.


8.9.11

Barbie dolly varden party cake


I've made this cake today for a little girl's 4th birthday party and while making it had a very interesting conversation with my daughter who is five.


I asked her if she also wants such a princess cake and she replied this is not a princess, it's a Barbie - which of course is so right! She then went on to say that she doesn't want a Barbie cake as she fears
I will take her Barbie's legs off and it means she can't play with them anymore - point made.
I guess I'll be making a princess castle instead for her birthday. :-)


That's how I made it: You'll need a Dolly Varden or similar shaped tin to bake the cake. In this instance I didn't bake the cake but here are some tips on how to best bake the cake).
You then need approx. 1.2 kg of white ready-to-roll fondant icing and approx. 500 g vanilla butter icing, silver and pink cachous and pink food colouring.

Invert the cake and trim the base to ensure it sits flat. Brush away crumbs. Use a palette knife to spread the cake with a thin layer of vanilla butter icing (crumb coating) and let set in the fridge.

Meanwhile colour 1/3 of the white fondant icing pink. I prefer to use gel colouring from Wilson and always use a skewer to only start with a small amount as the colour is very strong. Knead in the colour until even. Roll out the pink on a piece of baking paper until 2 mm thick and cover the cake board (if you use a very large board you might need more pink fondant icing) with it. Cut along the edges with a knife and keep the leftover for the dress layer (wrap tightly in cling wrap until needed). Set board aside.

Apply a second thick layer of butter icing to the cake and smooth then put back into fridge. Use 1/4 of the white fondant icing and colour light pink, wrap in cling wrap until needed. Roll out the remaining white fondant icing until 3 mm think and cover the cake smoothing the top and letting it crease towards the bottom so it looks like a ball gown.

Wrap leftover icing in cling wrap. Now is the time which for me is always a bit nerve wrecking. You have to move the cake from the working board to the covered board and to place the cake in the right spot. I use a big and sturdy palette knife to lift the cake up and over to the main board. Smooth and trim icing if necessary.

Roll out dark pink icing to 2mm and cut an approx. 24 cm circle (I used a plate or cake tin) and drape over the first layer, allowing the icing to create ruffles.

Roll white icing to 2 mm and cut approx. 15 cm circle and drape over the pink layer. Roll out the light pink to 2mm and cut to 10-12 cm circle and drape onto white layer.

Insert the doll into the centre of the cake and make the bodice dress part. If you don't have the half-doll topper you can use any barbie without legs. You then have to cut a wider hole to fit the torso into the cake (it's a bit of an operation really- but don't tell anyone).

Cut 3 strips from the light pink icing and wrap around two around the bodice and secure at the back. Cut a leaf shape with a cutter to make the front part of the dress. Roll up the long sides of the third strip to make it look like a belt and wrap around waist, secure ends at the back. For the neck use a tiny narrow strip and secure at the back. Cut out little flowers and use silver and /or pink cachous to decorate the doll.


6.4.10

Cake jobs


I am very excited as I have enrolled again in a Planet Cake class in April and I can't wait to get started. The classes are very popular and you have to be quick to get a spot so I've been lucky to get in. I have always been a fan of cake decorating and Planet Cake but since I worked with Paris Cutler on her Planet Cake book I admire them even more. In the meantime I've been making cakes for kids' birthdays parties so that I am not just spending money :-)

28.7.07

Interview with PlanetCake owner Paris


I chatted with Paris last week about her craft and business (and sneakily my portfolio as well). Having gone from strength to strength in recent years, Paris and her customized cake business "Planet Cake" are now internationally renowned and an integral part of the Sydney food scene. See my snapshots here. Apart from producing great works of cake art for celebs and gourmets alike, working for media companies and teaching heaps of cake lovers through their much sought-after courses, they have recently revamped their website. It now features what proves to be a hit especially in the US: videos (newsletter subscription required) with insights into their work and techniques.

26.11.06

How to do figurines for cakes

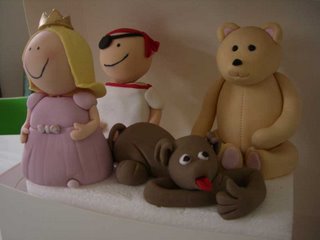
I've always had a soft spot for cake decoration and I became even more interessted in the art after working with Peggy Porschen in London and Hamburg. Being in Sydney gave me the opportunity to attend a course on making figurines for cakes out of sugar paste. The course was taught by Planet Cake - one of the best shops for it here. Have a look at their beautiful creations.

Princesses always fall for pirates (preferably if they are called Johnny Depp) ... but what are a bear and dog supposed to do about it?

26.1.06


Niedliche Teig-Hunde, komplett mit Hydranten für ihre kleinen Krümel-Geschäfte.

Get well soon! But can sugar cure?

Winterliche Motive in Keksform im Schaufenster.

15.10.05

Zweite Woche bei Peggy Porschen


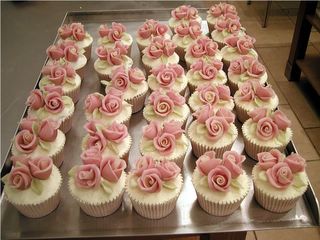
Zwischen Weihnachtscookies und Gingerbreadhouses (Lebkuchenhaeuser) muss noch eine Bestellung fuer eine Taufe gemacht werden: Cupcakes mit kleinen altrosa Marzipanrosen. Posted by Picasa

Geschafft, 99 kleine Rosen und ueber 120 Marzipanblaetter sind huebsch auf ihren Cupcakes platziert. Das wird aber eine tolle Taufe!

11.10.05


Endlich fertig verpackt, jetzt geht es bald zu Fortnum and Mason! Posted by Picasa

Die letzten Handgriffe: Cookies in Cellophan verpacken und mit einer Schleife versehen. Posted by Picasa

"christmas candles" a la Peggy Posted by Picasa

9.10.05

Arbeiten bei Peggy Porschen in London

Seit Montag arbeite ich bei "Peggy Porschen Cakes" in London, die ein Studio in Clapham besitzt. Peggy lernte ich ueber ihr hervorragendes Buch "Pretty Party Cakes" kennen und wir vereinbarten , dass ich ihr im Oktober fuer zwei Wochen zur Hand gehe. Das beruehmte Kaufhaus "Fortnum and Mason" (vergleichbar mit Harrods) bestellt bei Peggy regelmaessig leckere und toll verzierte Cupcakes, Cookies und Cakes.

Verzieren von "candy canes" mit Zuckerfarben und Silberperlen Posted by Picasa